ASR 1000 Upgrade Process [Step to Step]
![ASR 1000 Upgrade Process [Step to Step]](https://learnduty.com/wp-content/uploads/2022/04/image-28.png)
Pre-Upgrade steps:
Before starting the ASR1K upgrade, you should verify the current version of the ASR1K IOS XE via “show version” command, Also check the Rommon version using “show platform” command or “show rom-monitor 0” command.
It’s a best practice to save the configuration and take a Backup of the router configuration before the upgrade:
copy running-configuration startup-configuration
sh run
Contents
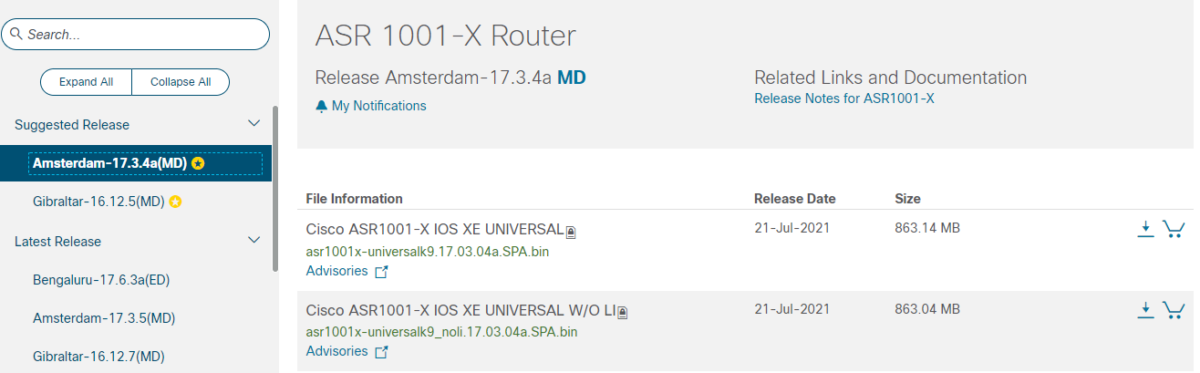
Step-1: Download the target image file from cisco Website
Navigate to the official Cisco Software website and donwload the ASR1K target image that you will install:
As an example, our taget image is 17.3.4a:
Note: Rommon Upgrade
After checking release notes and Rommon requirements of the target version, verify minimum and recommanded Rommon relaese table. If you need to upgrade the Rommon, also download the Rommon file from here.
Step-2: Upload Rommon and image OS files to bootflash:
We can upload the target image file to bootflash using two methods:
- USB drive
- TFTP
Via USB:
first check usb files via “dir usb0: ” and then upload the files of the target version to bootflash:
- Upload IOS XE software:
copy usb0:/asr1001x-universalk9.17.03.04a.SPA.bin bootflash:- Upload Rommon software:
copy usb0:/asr1000-rommon.173-1r.SPA.pkg bootflash:
Via TFTP:
copy tftp: bootflash:After upload, you can check bootflash files using “dir” command.
Step-3: Upgrade the Rommon of ASR1K:
If the target IOS XE version require that the Rommon need to be upgraded, you can perform this using the following command:
upgrade rom-monitor filename bootflash:asr1000-rommon.173-1r.SPA.pkg all
Step-4: Upgrade the IOS XE software of ASR1K:
In order to Upgrade the ASR1K, We have two modes of operation:
- Bundle mode: traditional way to upgrade IOS via booting the whole target image, this is memory consuming, and it’s not the recommended method.
- Install mode: separate the target image in different packages, the ASR will not load all of the RAM, and Cisco recommends using this mode to upgrade IOS XE.
I- Upgrade ASR1K Bundle Mode:
This is quite simple:
first, unset the old image file from the bootvar, then set the boot variable, and finally save the router configuration:
no boot system flash bootflash:asr1001x-universalk9.16.09.05.SPA.bin
boot system flash bootflash:asr1001x-universalk9.17.03.04a.SPA.bin
copy running-config startup-config
You can check the bootvar using command below:
show bootvar
and then reload the router:
reload
II- Upgrade ASR1K Install Mode:
The install add command copies the update package from a remote location to the device. Other methods to copy the package to bootflash are available. however, you must still enable the install add command for the installation to work.
For the install activate command to work, the package must be available in the device bootflash. Enable the install commit command to make updates persistent over reloads.
Installing an update replaces any previously installed data models. At any time, only one update is installed on the device.
The following figure illustrate the process of installing, activating and commit package:

- Install the IOS XE file (this will unpack it to multiple packages)
install add file bootflash:asr1001x-universalk9.17.03.04a.SPA.bin activate commit- Modify the boot variable to point to the “packages.conf” file:
conf t
 no boot system flash bootflash:asr1001x-universalk9.16.09.05.SPA.bin
 boot system flash bootflash:packages.conf
end
wr- Verify that the packages are pointing to the new version:
more bootflash:packages.conf- Save configuration and reboot the router:
wr
reload- After reloading the router, verify the current version and clean the bootflash from inactive packages:
show version
install remove inactive
That’s all, hope this was helpful.
![Explore The BGP Path Selection Attributes [Explained with Labs]](https://learnduty.com/wp-content/uploads/2022/07/image-28-800x450.png)