
Cisco ACI SCVMM Integration Guide [Step by step]
![Cisco ACI SCVMM Integration Guide [Step by step]](https://learnduty.com/wp-content/uploads/2022/01/pic2.png?v=1647900262)
Before we dive into the step on integrating SCVMM with ACI, the table below shows the mapping of APIC and SCVMM constructs:
| APIC | System Center |
|---|---|
| VMM Domain | Logical Switch and Logical Network |
| VMM Controller | SCVMM |
| SCVMM Cloud Name | Cloud (Fabric) |
| EPG | VM Network |
| Infrastructure VLAN | One infrastructure VM network for each logical switch |
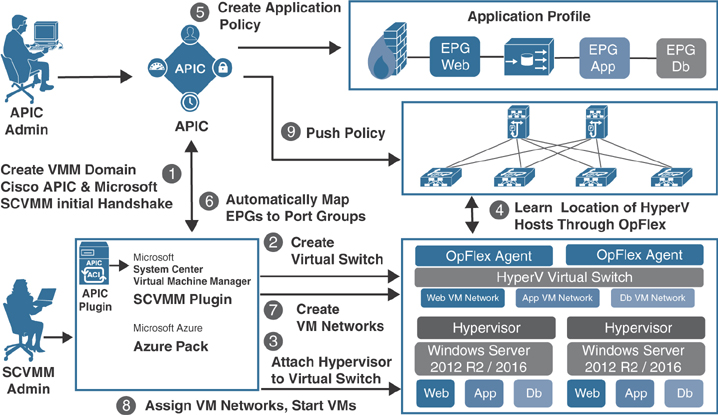
The figure below from “cisco express” illustrate the integration of Cisco ACI with Microsoft SCVMM:
Contents
- Step-1: Download and unzip the Cisco ACI and Microsoft Integration file
- Step-2: Install the APIC SCVMM Agent on SCVMM or on a Highly Available SCVMM
- Step-3: Generate the Opflex Agent certificate:
- Step-4: Add the OpFlex Certificate Policy to APIC
- Step-5: Install the OpflexAgent Certificate
- Step-6: Configure APIC IP Settings with OpflexAgent Certificate on the SCVMM Agent
- Step-7: Install the APIC Hyper-V Agent on the Hyper-V Server
- Step-8: Verify the APIC SCVMM Agent Installation on SCVMM
- Step-9: Verify the APIC Hyper-V Agent Installation on the Hyper-V Server
- Step-10: Create SCVMM Domain Profiles on APIC:
Step-1: Download and unzip the Cisco ACI and Microsoft Integration file
- Go to Cisco’s Application Policy Infrastructure Controller (APIC) Website:http://www.cisco.com/c/en/us/support/cloud-systems-management/application-policy-infrastructure-controller-apic/tsd-products-support-series-home.html
- Choose All Downloads for this Product.
- Choose the release version and the aci-msft-pkg-2.2.1x.zip file.
- Click Download and Unzip the aci-msft-pkg-2.2.1x.zip file.
Step-2: Install the APIC SCVMM Agent on SCVMM or on a Highly Available SCVMM
1- Log in to the SCVMM server with SCVMM administrator credentials.
2 -On the SCVMM server in Explorer, locate the APIC SCVMM Agent.msi file.
3- Right-click APIC SCVMM Agent.msi file and select Install.
4- In the Cisco APIC SCVMM Agent Setup dialog box, perform the following actions:
- Click Next.
- Check the I accept the terms in the License Agreement check box and click Next.
- Enter your account name and password credentials.
- Provide the same credentials that you used for the SCVMM console. The Cisco APIC SCVMM agent requires these credentials for the SCVMM operations to be able to function.
- After successful validation of the account name and password credentials, click Install.
- Click Finish.
Step-3: Generate the Opflex Agent certificate:
This step describes how to generate the APIC OpFlex certificate to secure communication between the Application Policy Infrastructure Controller (APIC) and SCVMM agents.
1- Log in to the SCVMM server, choose Start > Run > Windows Powershell, and then, in the app bar, click Run as administrator.
2- Load ACISCVMMPsCmdlets and create a new OpflexAgent.pfx certificate file, by entering the following commands:
Windows PowerShell
Copyright (C) 2013 Microsoft Corporation. All rights reserved.

PS C:\Users\Administrator.INSCISCO> cd \
PS C:\> cd '.\Program Files (x86)\ApicVMMService'
PS C:\Program Files (x86)\ApicVMMService> Import-Module .\ACIScvmmPsCmdlets.dll
PS C:\Program Files (x86)\ApicVMMService> Get-Command -Module ACIScvmmPsCmdlets

CommandType     Name                      ModuleName
-----------     ----                      ----------
Cmdlet          Get-ACIScvmmOpflexInfo    ACIScvmmPsCmdlets
Cmdlet          Get-ApicConnInfo          ACIScvmmPsCmdlets
Cmdlet          Get-ApicCredentials       ACIScvmmPsCmdlets
Cmdlet          New-ApicOpflexCert        ACIScvmmPsCmdlets
Cmdlet          Read-ApicOpflexCert       ACIScvmmPsCmdlets
Cmdlet          Set-ApicConnInfo          ACIScvmmPsCmdlets
Cmdlet          Set-ApicCredentials       ACIScvmmPsCmdlets
3- Generate a new OpFlex Certificate, by entering the following commands. The “New-ApicOpflexCert” PowerShell command will both generate the PFX certificate package file for use on other machines and install the certificate to the local machine’s Certificate Store:
PS C:\Program Files (x86)\ApicVMMService> $pfxpassword = ConvertTo-SecureString "MyPassword" -AsPlainText -Force
PS C:\Program Files (x86)\ApicVMMService> New-ApicOpflexCert -ValidNotBefore 1/1/2015 -ValidNotAfter 1/1/2020
-Email t0@domain.com -Country USA -State CA -Locality "San Jose" -Organization MyOrg –PfxPassword $pfxpassword
Successfully created:
C:\Program Files (x86)\ApicVMMService\OpflexAgent.pfx

PS C:\Program Files (x86)\ApicVMMService>
4- To display the certificate information to be used on the APIC.
PS C:\Program Files (x86)\ApicVMMService> $pfxpassword = ConvertTo-SecureString "MyPassword"
-AsPlainText -Force
PS C:\Program Files (x86)\ApicVMMService> Read-ApicOpflexCert -PfxFile
"C:\Program Files (x86)\ApicVMMService\OpflexAgent.pfx" -PfxPassword $pfxpassword

-----BEGIN CERTIFICATE-----
MIIDojCCAoqgAwIBAgIQHz+F2luuOpFKK0p3jxWRfjANBgkqhkiG9w0BAQ0FADBfMRwwGgYJKoZI
hvcNAQkBFg10MEBkb21haW4uY29tMQ4wDAYDVQQKDAVNeU9yZzELMAkGA1UECAwCQ0ExDDAKBgNV
BAYTA1VTQTEUMBIGA1UEAwwLT3BmbGV4QWdlbnQwHhcNMTUwMTAxMDAwMDAwWhcNMjAwMTAxMDAw
MDAwWjBfMRwwGgYJKoZIhvcNAQkBFg10MEBkb21haW4uY29tMQ4wDAYDVQQKDAVNeU9yZzELMAkG
A1UECAwCQ0ExDDAKBgNVBAYTA1VTQTEUMBIGA1UEAwwLT3BmbGV4QWdlbnQwggEiMA0GCSqGSIb3
DQEBAQUAA4IBDwAwggEKAoIBAQCzQS3rvrIdxiHfeAUqtX68CdjIL1+nDtqBH8LzDk0RBVb0KU6V
9cYjCAMwW24FJo0PMt4XblvFJDbZUfjWgEY1JmDxqHIAhKIujGsyDoSZdXaKUUv3ig0bzcswEGvx
khGpAJB8BCnODhD3B7Tj0OD8Gl8asd1u24xOy/8MtMDuan/2b32QRmn1uiZhSX3cwjnPI2JQVIif
n68L12yMcp1kJvi6H7RxVOiES33uz00qjxcPbFhsuoFF1eMT1Ng41sTzMTM+xcE6z72zgAYN6wFq
T1pTCLCC+0u/q1yghYu0LBnARCYwDbe2xoa8ClVcL3XYQlEFlp1+HFfd//p1ro+bAgMBAAGjWjBY
MBIGA1UdEwEB/wQIMAYBAf8CAQAwEwYDVR0lBAwwCgYIKwYBBQUHAwEwHQYDVR0OBBYEFGuzLCG5
4DEcP+bPiFbiDjMDQ3tMMA4GA1UdDwEB/wQEAwIBBjANBgkqhkiG9w0BAQ0FAAOCAQEANc5kKvN4
Q62tIYa1S2HSyiwjaMq7bXoqIH/ICPRqEXu1XE6+VnLnYqpo3TitLmU4G99uz+aS8dySNWaEYghk
8jgLpu39HH6yWxdPiZlcCQ17J5B5vRu3Xjnc/2/ZPqlQDEElobrAOdTko4uAHG4lFBHLwAZA/f72
5fciyb/pjNPhPgpCP0r7svElQ/bjAP1wK8PhCfd7k2rJx5jHr+YX8SCoM2jKyzaQx1BAdufspX3U
7AWH0aF7ExdWy/hW6CduO9NJf+98XNQe0cNH/2oSKYCl9qEK6FesdOBFvCjlRYR9ENqiY4q7xpyB
tqDkBm80V0JslU2xXn+G0yCWGO3VRQ==
-----END CERTIFICATE-----
PS C:\Program Files (x86)\ApicVMMService>
Step-4: Add the OpFlex Certificate Policy to APIC
This step describes how to add the OpFlex certificate policy to the Application Policy Infrastructure Controller (APIC) :
1- Log in to the APIC GUI, on the menu bar, choose ADMIN > AAA.
2- In the Navigation pane, choose Security Management > Local Users and click on admin.
3- In the PROPERTIES pane, choose Actions > Create X509 Certificate, in the drop-down list, enter the name and data.
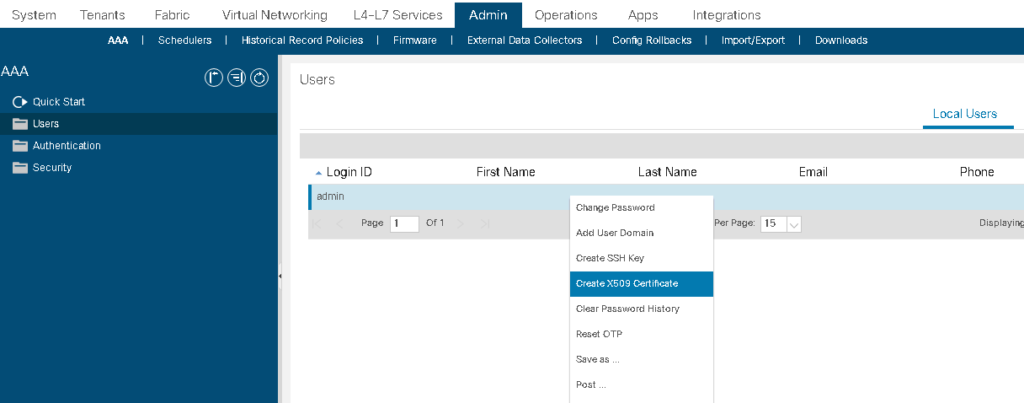
4- In the Create X509 Certificate dialog box, in the Name field, you must enter “OpflexAgent“.
5- On the SCVMM server, enter the output of the PowerShell Read-ApicOpflexCert cmdlet.
- When you run the Read-ApicOpflexCert cmdlet, provide the full link when prompted for the name of the pfx file: C:\Program Files (x86)\ApicVMMService\OpflexAgent.pfx, then enter the password.
6- Copy from the beginning of “—–BEGIN CERTIFICATE—–” to the end of “—–END CERTIFICATE—–“and paste it in the DATA field.
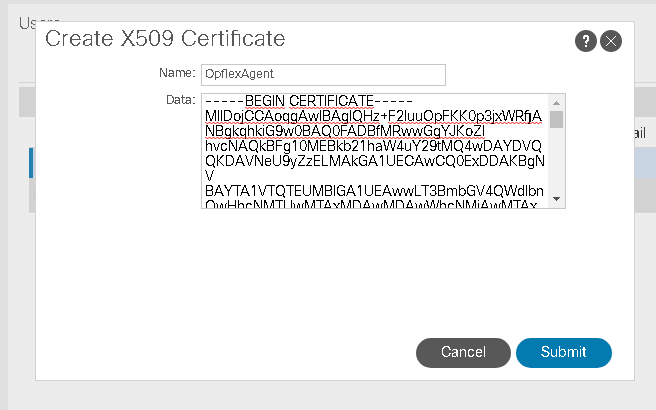
7- Click SUBMIT.
In the PROPERTIES pane, under the User Certificates field, you will see the user certificate displayed.
Step-5: Install the OpflexAgent Certificate
- Log in to the SCVMM server with administrator credentials.
- You must add OpFlex security certificate to the local machine. The Microsoft SCVMM agent has a security certificate file named OpflexAgent.pfx located in the C:\Program Files (x86)\ApicVMMService folder on the SCVMM server. If the following steps are not performed on your SCVMM servers, the APIC SCVMM Agent cannot communicate with the Application Policy Infrastructure Controller (APIC) .
- Install the OpFlex security certificate on the SCVMM Windows Server 2012 local machine’s certificate repository. On each SCVMM server, install this certificate by performing the following steps:
- Choose Start > Run.
- Enter mmc and click OK.
- In the Console Root window, on the menu bar, choose Add/Remove Snap-in.
- In the Available Snap-ins field, choose Certificates and click Add.
- In the Certificates snap-in dialog box, choose the Computer Account radio button, and click Next.
- In the Select Computer dialog box, choose the Local Computer radio button, and click Finish.
- Click OK to go back to the main MMC Console window.
- In the MMC Console window, double-click Certificates (local computer) to expand its view.
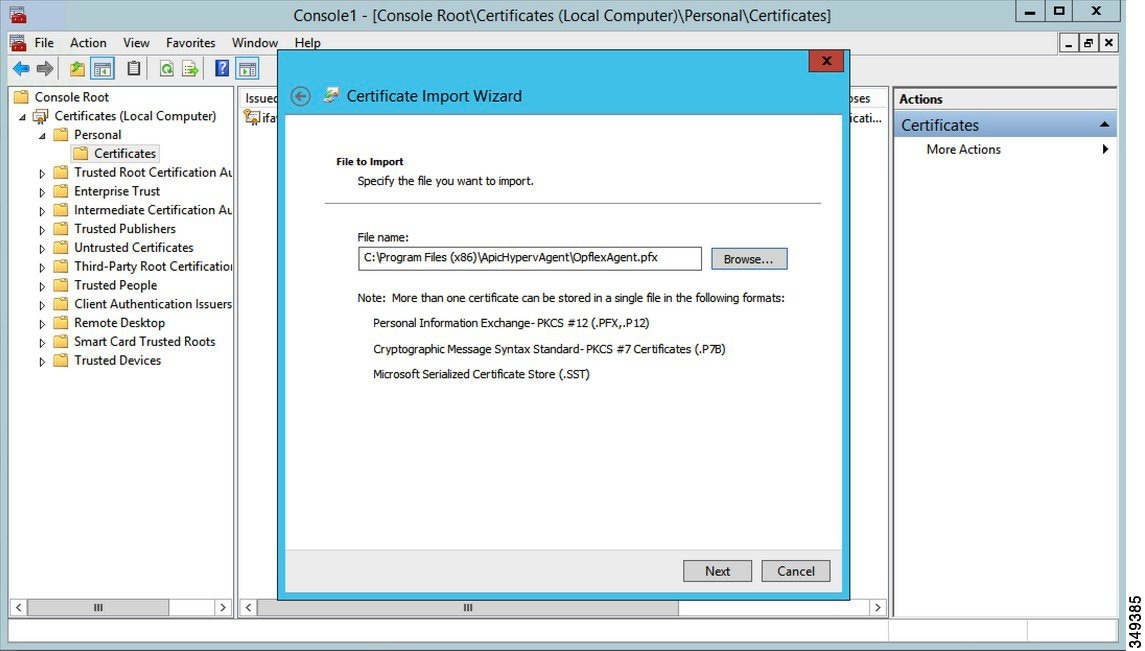
- Right-click Certificates under Personal and choose All Tasks > Import.
- In the Certificates Import Wizard dialog box, perform the following actions:
- Click Next.
- Browse to the Opflex Agent file and click Next:
- Enter the password for the certificate that was provided when you installed MSI.
- You must choose the Mark this key as exportable. This will allow you to back up or transport your keys at a later time radio button.
- Choose the Include all extended properties radio button.
- Choose the Place all certificates in the following store radio button, browse to locate Personal, and click Next.
- Click Finish.
- Click OK.

Step-6: Configure APIC IP Settings with OpflexAgent Certificate on the SCVMM Agent
This step describes how to configure the Cisco Application Policy Infrastructure Controller (APIC) IP settings with OpflexAgent Certificate on the System Center Virtual Machine Manager (SCVMM) agent.
1- Log in to the SCVMM server and choose Start > Run > Windows PowerShell.
2- Load ACISCVMMPsCmdlets by entering the following commands:
Note
Get-ApicCredentials and Set-ApicCredentials are now deprecated, use Get-ApicConnInfo and Set-ApicConnInfo.
Windows PowerShell
Copyright (C) 2013 Microsoft Corporation. All rights reserved.

PS C:\Users\Administrator.INSCISCO> cd \
PS C:\> cd '.\Program Files (x86)\ApicVMMService'
PS C:\Program Files (x86)\ApicVMMService> Import-Module .\ACIScvmmPsCmdlets.dll
PS C:\Program Files (x86)\ApicVMMService> Get-Command -Module ACIScvmmPsCmdlets

CommandType     Name                                               ModuleName
-----------     ----                                               ----------
Cmdlet          Get-ACIScvmmOpflexInfo                             ACIScvmmPsCmdlets
Cmdlet          Get-ApicConnInfo                                   ACIScvmmPsCmdlets
Cmdlet          Get-ApicCredentials                                ACIScvmmPsCmdlets
Cmdlet          New-ApicOpflexCert                                 ACIScvmmPsCmdlets
Cmdlet          Read-ApicOpflexCert                                ACIScvmmPsCmdlets
Cmdlet          Set-ApicConnInfo                                   ACIScvmmPsCmdlets
Cmdlet          Set-ApicCredentials                                ACIScvmmPsCmdlets


PS C:\Program Files (x86)\ApicVMMService>
3- Set up Cisco APIC connection parameters for the SCVMM agent by entering the following commands, adding at least one Cisco APIC:
PS C:\Users\administrator.APIC> Set-ApicConnInfo -ApicNameOrIPAddress APIC_1_IP
-CertificateSubjectName OpflexAgent

Apic Credential is successfully set to APIC SCVMM service agent.
4- Verify that the Cisco APIC connection parameters are set properly on Cisco APIC SCVMM Agent by entering the following command:
PS C:\Program Files (x86)\ApicVMMService> Get-ApicConnInfo


EndpointAddress        :
Username               :
Password               :
ApicAddresses          : 172.23.139.224
ConnectionStatus       : Connected
adminSettingsFlags     : 0
certificateSubjectName : OpflexAgent
ExtensionData          :


PS C:\Program Files (x86)\ApicVMMService>
Step-7: Install the APIC Hyper-V Agent on the Hyper-V Server
1- Log on to the SCVMM server and bring the Hyper-V node into Maintenance Mode.
2- Log in to the Hyper-V server with administrator credentials.
3- On the Hyper-V server in File Explorer, locate the APIC Hyper-V Agent.msi file.
4- Right-click the APIC Hyper-V Agent.msi file and choose Install.
5- In the ApicHypervAgent Setup dialog box, perform the following actions:
6- Check that I accept the terms in the License Agreement check box, click Install, click Finish.
7- You must add OpFlex security certificate in the local system. The Microsoft Hyper-V agent has a security certificate file named OpflexAgent.pfx located in the C:\Program Files (x86)\ApicVMMService folder on the SCVMM server. If the following steps are not performed on your Hyper-V servers, the APIC Hyper-V Agent cannot communicate with the Cisco Application Centric Infrastructure (ACI) fabric leaf switches.
Install the OpFlex security certificate on the Hyper-V Windows Server 2012 local machine’s certificate repository. On each Hyper-V server, install this certificate by performing the following steps:
- Choose Start > Run.
- Enter mmc and click OK.
- In the Console Root window, on the menu bar, choose Add/Remove Snap-in.
- In the Available Snap-ins field, choose Certificates and click Add.
- In the Certificates snap-in dialog box, choose the Computer Account radio button, and click Next.
- In the Select Computer dialog box, choose the Local Computer radio button, and click Finish.
- Click OK to go back to the main MMC Console window.
- In the MMC Console window, double-click Certificates (local computer) to expand its view.
- Right-click Certificates under Personal and choose All Tasks > Import.
- In the Certificates Import Wizard dialog box, perform the following actions:
– Click Next.
– Browse to the Opflex Agent file and click Next.
– Enter the password for the certificate that was provided when you installed MSI.
– You must choose the Mark this key as exportable. This will allow you to back up or transport your keys at a later time radio button.
– Choose the Include all extended properties radio button.
– Choose the Place all certificates in the following store radio button, browse to locate Personal, and click Next.
– Click Finish.
– Click OK.
8- Log on to the SCVMM Sserver and bring the Hyper-V node out of Maintenance Mode.
Repeat steps 1 through 8 for each Hyper-V server.
Step-8: Verify the APIC SCVMM Agent Installation on SCVMM
1- Choose Start > Control Panel.
2- In the Control Panel window, enter Control Panel\Programs\Programs and Features in the address bar.
3- Locate Cisco APIC SCVMM Agent. If Cisco APIC SCVMM Agent is present, then the product is installed.
If Cisco APIC SCVMM Agent is not present, then the product is not installed. See the Installing the APIC SCVMM Agent on SCVMM or Installing the APIC Agent on SCVMM Using the Windows Command Prompt section.
4- Verify the ApicVMMService is in RUNNING state through the GUI or CLI:
- GUI method: Choose Start > Run and enter services.msc. In the Service pane, locate the ApicVMMService and verify the state is RUNNING.
- CLI method: From the command prompt, enter the sc.exe query ApicHypervAgent command and verify the state is RUNNING:
sc.exe query ApicVMMService

SERVICE_NAME: ApicVMMService
TYPE : 10 WIN32_OWN_PROCESS
STATE : 4 RUNNING
(STOPPABLE, NOT_PAUSABLE, ACCEPTS_SHUTDOWN)
WIN32_EXIT_CODE : 0 (0x0)
SERVICE_EXIT_CODE : 0 (0x0)
CHECKPOINT : 0x0
WAIT_HINT : 0x0
Step-9: Verify the APIC Hyper-V Agent Installation on the Hyper-V Server
1- Choose Start > Control Panel.
2- In the Control Panel window, enter Control Panel\Programs\Programs and Features in the address bar.
3- Locate Cisco APIC Hyperv Agent. If Cisco APIC Hyperv Agent is present, then the product is installed.
If Cisco APIC Hyperv Agent is not present, then the product is not installed. See the Installing the APIC Hyper-V Agent on the Hyper-V Server or Installing the APIC Hyper-V Agent on the Hyper-V Server Using the Windows Command Prompt section.
4- Verify the ApicHypervAgent is in RUNNING state through the GUI or CLI:
- GUI method: Choose Start > Run and enter services.msc. In the Service pane, locate the ApicHypervAgent and verify the state is RUNNING.
- CLI method: From the command prompt, enter the sc.exe query ApicHypervAgent command and verify the state is RUNNING:
sc.exe query ApicHypervAgent

SERVICE_NAME: ApicHypervAgent
TYPE : 10 WIN32_OWN_PROCESS
STATE : 4 RUNNING
(STOPPABLE, NOT_PAUSABLE, ACCEPTS_SHUTDOWN)
WIN32_EXIT_CODE : 0 (0x0)
SERVICE_EXIT_CODE : 0 (0x0)
CHECKPOINT : 0x0
WAIT_HINT : 0x0
Step-10: Create SCVMM Domain Profiles on APIC:
1- Log in to the APIC GUI, and then choose Virtual Networking > Inventory.
2- In the Navigation pane, expand VMM Domains, right-click the VM Provider Microsoft and choose Create SCVMM Domain.
3- In the Create SCVMM domain dialog box, in the Name field, enter the domain’s name (productionDC).
4- Optional: In the Delimiter field, enter one of the following: |, ~, !, @, ^, +, or =. If you do not enter a symbol, the system default | delimiter will appear in the policy.
5- In the Associated Attachable Entity Profile field, from the drop-down list, choose Create Attachable Entity Profile.
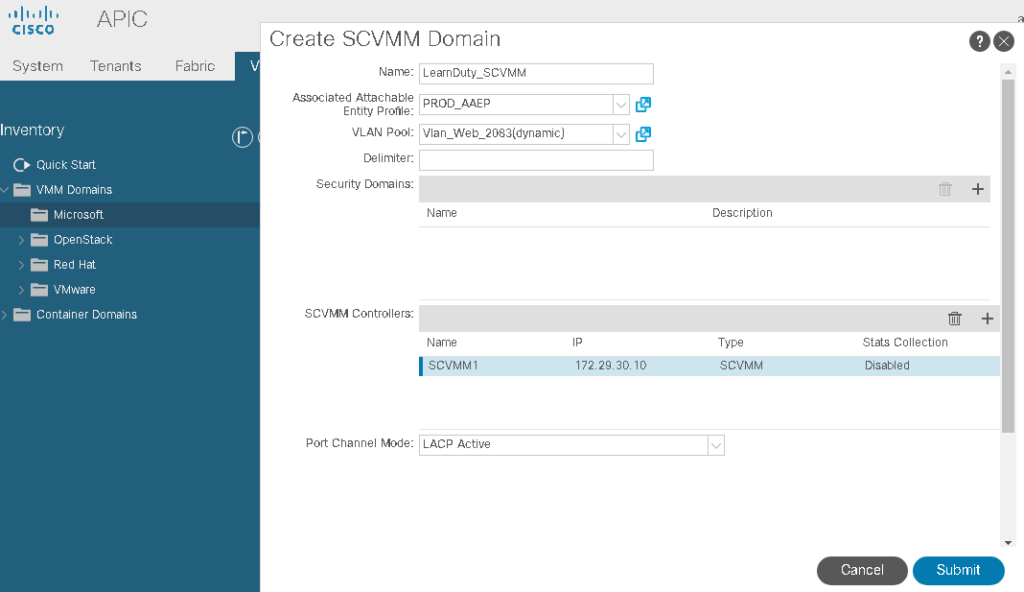
6- In the VLAN Pool field, from the drop-down list, choose to Create VLAN Pool. In the Create VLAN Pool dialog box, perform the following actions:
- In the Name field, enter the VLAN pool name (VlanRange).
- In the Allocation Mode field, verify that the Dynamic Allocation radio button is selected.
- Expand Encap Blocks to add a VLAN block. In the Create Ranges dialog box, enter a VLAN range.
- Note: We recommend a range of at least 200 VLAN numbers. Do not define a range that includes the reserved VLAN ID for infrastructure network because that VLAN is for internal use.
Click OK, and click Submit.
7- Expand SCVMM. In the Create SCVMM Controller dialog box, verify that the Type is SCVMM, and then perform the following actions:
In the Name field, enter the name (SCVMM1).
- To connect to an SCVMM HA Cluster, specify the SCVMM HA Cluster IP address or the SCVMM Cluster Resource DNS name, which was specified during the SCVMM HA installation. See How to Connect to a Highly Available VMM Management Server by Using the VMM Console: https://technet.microsoft.com/en-us/library/gg610673.aspx
- In the Host Name (or IP Address) field, enter the Fully Qualified Domain Name (FQDN) or IP address of your SCVMM.
- In the SCVMM Cloud Name field, enter the SCVMM cloud name (SCVMM-Cld).
- Click OK.
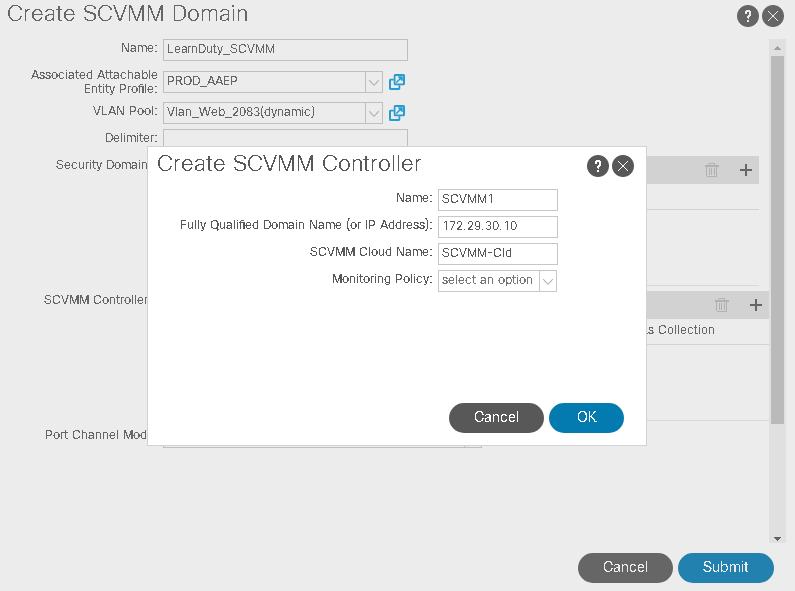
and Click Submit.
References:
1-https://www.cisco.com/c/en/us/td/docs/switches/datacenter/aci/apic/sw/4-x/virtualization/Cisco-ACI-Virtualization-Guide-42x/Cisco-ACI-Virtualization-Guide-421_chapter_01100.html
2-https://ptgmedia.pearsoncmg.com/images/chap6_9781587145285/elementLinks/06fig08_alt.jpg

![OSPF DR and BDR Election Explained [with Configuration]](https://learnduty.com/wp-content/uploads/2022/03/image-33.png?v=1647900046)
![OSPF Neighbor Adjacency Requirements [With Configuration]](https://learnduty.com/wp-content/uploads/2022/03/image-23-418x450.png?v=1647900064)
![OSPF Neighbor States Explained [Step by Step]](https://learnduty.com/wp-content/uploads/2022/03/image-13.png?v=1647900076)
![OSPF Area Types Explained and Configuration [Demystified]](https://learnduty.com/wp-content/uploads/2022/03/image-8.png?v=1647900083)