Cisco ACI Simulator Installation On VMware vCenter [Step by Step]
![Cisco ACI Simulator Installation On VMware vCenter [Step by Step]](https://learnduty.com/wp-content/uploads/2022/03/image-69.png)
First of all, you need to identify which ACI Version you need for the lab (it can be a version similar to a PROD Environment and you want to test functionality in the LAB).
Download Cisco ACI Simulator OVA images
- In order to download ACI Simulator, Navigate to Cisco Softwre Download Official Website.
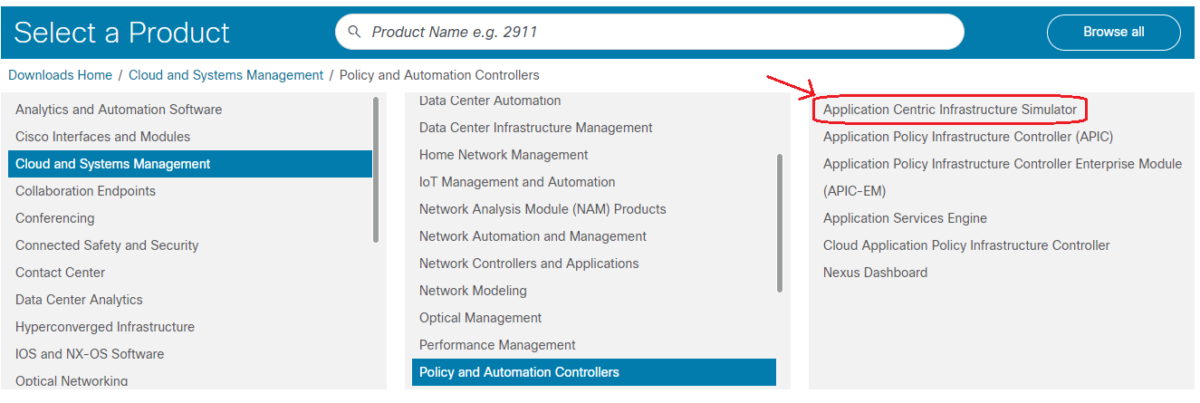
- ACI Simulator images can be found under this path:
Downloads Home > Cloud and Systems Management > Policy and Automation Controllers > Application Centric Infrastructure Simulator
- Download All Ova files Parts for a specific version:
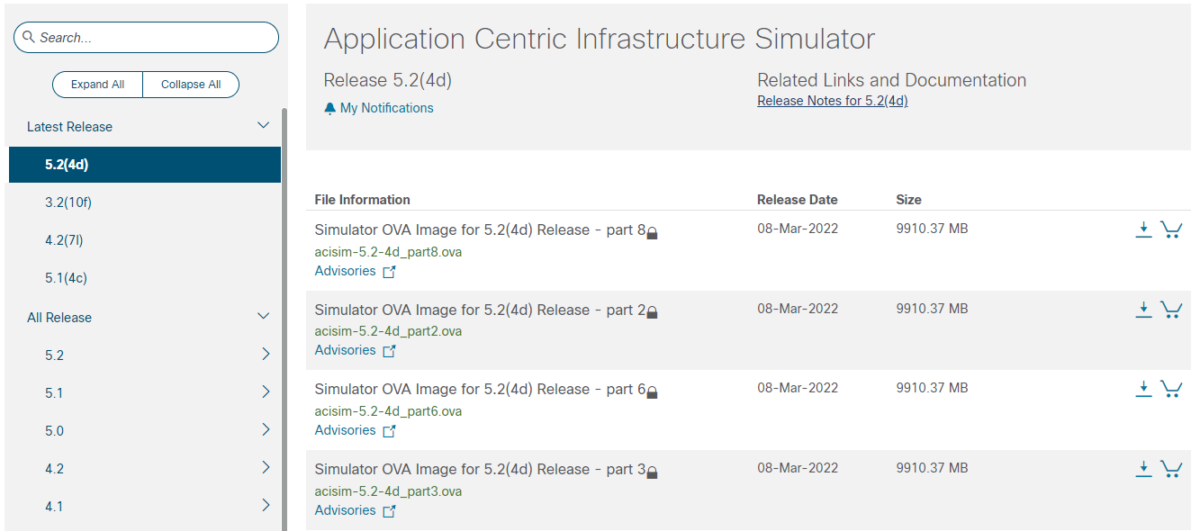
- For our case, we want to install ACI 5.2(4d) Simulator, We have to download all 8 parts (.Ova files)
Concatenate or merge all Ova Files parts into a single Ova file
This task will depend on which operating system you are using:
Concatenate OVA Files on Windows 10
It’s quite easy, you don’t need to install anything to do this, just open the cmd prompt interface and use the “type” command.
- Basic Syntax is:
type file1.ova file2.ova file3.ova > file.ova
Note: You have to place all ACI Simulator OVA parts which you have downloaded from Cisco Website inside a single folder, then navigate to that folder path and place the type command:
Here’s an example to merge the OVA parts of the ACI simulator:
cd C:\Users\LearnDuty\Downloads
type acisim-5.2-4d_part1.ova acisim-5.2-4d_part2.ova acisim-5.2-4d_part3.ova acisim-5.2-4d_part4.ova acisim-5.2-4d_part5.ova acisim-5.2-4d_part6.ova acisim-5.2-4d_part7.ova acisim-5.2-4d_part8.ova  > acisim-5.2-4d.ova
Concatenate OVA Files on Linux
Also, you need to place all Ova parts inside a single repository then concatenate them using the “cat” command:
- Basic Syntax is:
cat file1.ova file2.ova file3.ova > file.ova
Here’s an example according to our case:
cd /etc/
cat acisim-5.2-4d_part1.ova acisim-5.2-4d_part2.ova acisim-5.2-4d_part3.ova acisim-5.2-4d_part4.ova acisim-5.2-4d_part5.ova acisim-5.2-4d_part6.ova acisim-5.2-4d_part7.ova acisim-5.2-4d_part8.ova  > acisim-5.2-4d.ova
Note: This task may take a while to finish cause it will pass through all OVA parts and merge them inside a single OVA (the size of the final OVA will be big, that’s normal).
Upload The final ACI Simulator OVA File to VMware vCenter
- Access to VMware vsphere vCenter GUI Interface and login to your account:

- Right-click on the Cluster or ESXi you want to deploy ACI Simulator VM on, then chose “Deploy OVF Template”.

Deploy OVF Template wizard will show up and need to go through some steps to complete the deployment of ACI Simulator VM:
- First select Local File in order to upload the ACI Simulator OVA File (merged File):

- Select the OVA file then Click Next.

- Select the Compute Cluster to use, or ESXi:

- Click Next, then chose the Storage to use:

- And Finally, select the Network Port Group (VLAN) to deploy the VM on and Click Next:

Click Finish and the ACI Simulator VM deployment will start.
Note: This can take a while since the OVA size is quite big (over Gb).
Initial Setup of ACI Simulator
- Power On VM: Once the OVA is uploaded to vCenter and VM deployed, you can power on the VM and access it via Console Interface:


- To Complete the Initial setup of ACI Fabric, please refer to this Post:
That’s all, I hope this was helpful.

